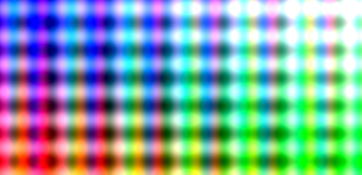
Simple fullscreen effect
In this tutorial, we create a simple animation with mimas and four, showing how to connect all the pieces together from window declaration and callbacks to timers, geometry and effects.

Note that you must run this example with luajit since plain lua is not supported by four.
Download source
Require
Every script must start by requiring lubyk to setup file paths, load some globals such as "class" or "lk" and setup auto-loading of dependencies.
require 'lubyk'
Declare some constants.
local WIN_SIZE   = {w = 400, h = 400}
local WIN_POS    = {x = 10 , y = 10 }
local SATURATION = 0.4
Geometry
We must now prepare the geometry that we want to display. In this example, we simply create two triangles that fill the clip space (= screen).
local function square()
Vertex buffer (list of coordinates).
  local vb = four.Buffer { dim = 3,
             scalar_type = four.Buffer.FLOAT }
Color buffer (colors for each coordinate).
  local cb = four.Buffer { dim = 4,
             scalar_type = four.Buffer.FLOAT }
Index buffer (actual triangles defined with vertices in vb).
  local ib = four.Buffer { dim = 1,
             scalar_type = four.Buffer.UNSIGNED_INT }
The drawing shows the coordinates and index values that we will use when filling the index.
(-1, 1)              (1, 1)
  +--------------------+
  | 2                3 |
  |                    |
  |                    |
  | 0                1 |
  +--------------------+
(-1,-1)              (1, -1)
Create four vertices, one for each corner.
  vb:push3D(-1.0, -1.0, 0.0)
  vb:push3D( 1.0, -1.0, 0.0)
  vb:push3D(-1.0,  1.0, 0.0)
  vb:push3D( 1.0,  1.0, 0.0)
Colors for the positions above.
  cb:pushV4(four.Color.red())
  cb:pushV4(four.Color.green())
  cb:pushV4(four.Color.blue())
  cb:pushV4(four.Color.white())
Create two triangles made of 3 vertices. Note that the index is zero based.
  ib:push3D(0, 1, 2)
  ib:push3D(1, 3, 2)
Create the actual geometry object with four.Geometry. Set the primitive to triangles and set index and data with the buffered we just prepared.
  return four.Geometry {
    primitive = four.Geometry.TRIANGLE,
    index = ib,
    data = { vertex = vb, color = cb}
  }
End of the local square() function definition.
end
Renderer
Create the renderer with four.Renderer.
renderer = four.Renderer {
  size = four.V2(WIN_SIZE.w, WIN_SIZE.h),
}
Camera
Use four.Camera to create a simple camera.
camera = four.Camera()
Effect
We create a new four.Effect that will process our geometry and make something nice out of it.
default_uniforms declares the uniforms and sets default values in case the renderable (in our case obj) does not redefine these values.
The special value RENDER_FRAME_START_TIME set for time will give use the current time in seconds (0 = script start).
local effect = four.Effect {
  default_uniforms = {
    saturation = 0.5,
    time = four.Effect.RENDER_FRAME_START_TIME,
  },
}
Define the vertex shader. This shader simply passes values along to the fragment shader.
effect.vertex = four.Effect.Shader [[
  in vec4 vertex;
  in vec4 color;
  out vec4 v_vertex;
  out vec4 v_color;
  void main()
  {
    v_vertex = vertex;
    v_color  = color;
    gl_Position = vertex;
  }
]]
Define the fragment shader. This shader simply creates periodic colors based on pixel position and time.
effect.fragment = four.Effect.Shader [[
  in vec4 v_vertex;
  in vec4 v_color;

  // These uniform names must reflect the default_uniforms that we declared.
  uniform float saturation;
  uniform float time;
  float t = time;

  out vec4 color;

  void main() {

    vec4 v = 20 * (v_vertex + vec4(sin(t/10), sin(t/20), sin(t/30), 0.0));
    float r = saturation + 0.25 * (sin(3*v.x) + sin(v.y));
    float g = saturation + 0.25 * (sin(v.x) + sin(v.y));
    float b = saturation + 0.25 * (sin(2*v.x) + sin(v.y));
    // blend effect with interpolated color
    color = vec4(v_color.r + r, v_color.g + g, v_color.b + b, 1);
  }
]]
Renderable
Create a simple renderable object. In four, a renderable is a table that contains enough information to be rendered.
The @saturation@ parameter is a uniform declaration. The value of this variable will be accessible in the shader (see Effect above).
We set the geometry to the fullscreen square by calling our function and assign our simple effect.
obj = {
  saturation = SATURATION,
  geometry   = square(),
  effect     = effect,
}
Window
We create an OpenGL window with mimas.GLWindow, set the size and position.
win = mimas.GLWindow()
win:resize(WIN_SIZE.w, WIN_SIZE.h)
win:move(WIN_POS.x, WIN_POS.y)
We then setup some simple keyboard actions to toggle fullscreen with the space bar.
Only react to key press (press = true).
function win:keyboard(key, press)
  if key == mimas.Key_Space and press then
    win:swapFullScreen()
  end
end
In case we resize the window, we want our content to scale so we need to update the renderer's size attribute.
function win:resized(w, h)
  renderer.size = four.V2(w, h)
end
OpenGL initialize function is called only once. We simply use it to log render engine information.
function win:initializeGL()
  renderer:logInfo()
end
The window's paint function calls four.Renderer.render with our camera and object.
function win:paintGL()
  renderer:render(camera, {obj})
end
Show the window once all the the callbacks are in place.
win:show()
Runtime
Timer
Since our effect is a function of time, we update at 60 Hz. For this we create a timer that asks the window to update every few milliseconds.
We also change the uniform's saturation with a random value between [0, 0.8] for a stupid blink effect.
timer = lk.Timer(1/60, function()
  win:update()
  obj.saturation = math.random() * 0.8
end)
Start the timer.
timer:start()
Run
And finally, run the scheduler (enter main loop).
run()
